
My jewelry pal, Cindy Wimmer, has just announced the schedule for the 2011 ArtBliss workshops in Northern Virginia. Click here for more information. Registration opens this Saturday and classes have been known to sell out!
My jewelry pal, Cindy Wimmer, has just announced the schedule for the 2011 ArtBliss workshops in Northern Virginia. Click here for more information. Registration opens this Saturday and classes have been known to sell out!


I’ve mentioned before how I’m currently enamored with the look of purple, pink, and orange together. It all started with something I saw in San Francisco. I got the idea to make a set of stacking rings with these colors and (in the middle of the night) scrawled a sketch on our hotel memo pad. That was back in March, and I finally took the time to make them. Pink topaz, mandarin garnet, amethyst, and an olive green CZ as stacking rings so I can mix and match depending on my mood. The inspiration piece was 18K gold, which is really pricey right now, so I’m compromising by sending these to be matte vermeil’ed.

I used the same sample piece of copper for etching with ferric chloride since it was still masked with duct tape from Etching Round 1. I traced over the monograms with a Sharpie oil-based paint marker as the resist, which seems to have a more consistent application than a regular Sharpie but is much easier to use than nail polish. (Available in three thicknesses where art supplies are sold, in my case at Michaels.) I let the copper plate sit in the etching solution for about an hour, checking it every 20 minutes or so to see how it was going. It’s hard for me to tell how much etching is happening because the resist itself is three-dimensional, but finally I couldn’t wait any longer so I rinsed the piece off and removed the resist with acetone.
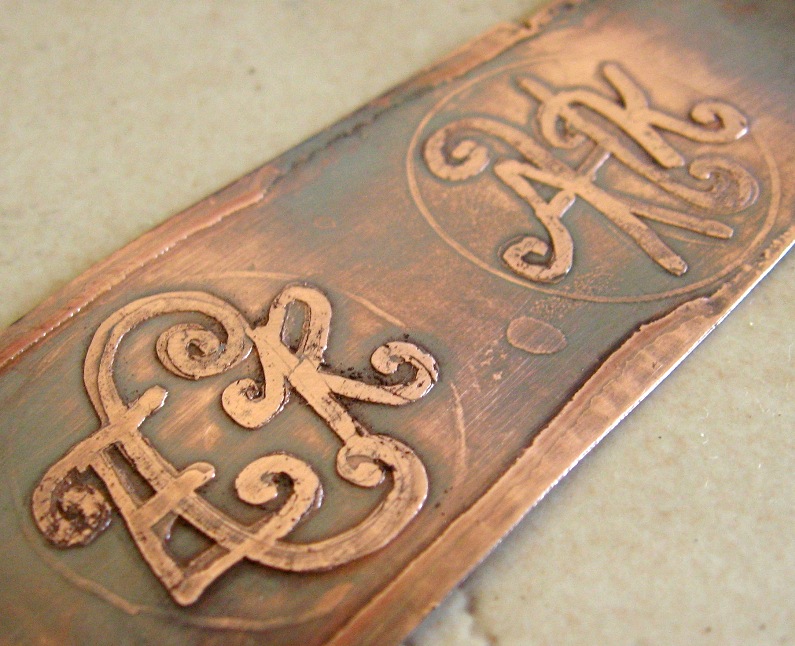
You can actually see both rounds of etching in the top of the closer monogram and the circles around both (which were only salt water etched). Etching is a much more subtle texture than what I normally do with PMC. And, like I said, it’s hard to tell how much etching is happening during the process, so I guess salt water etching was more effective than I thought.
At least now I can honestly say I can etch copper.

My friend Trice, who sews and will monogram anything that isn’t nailed down (and does a great job), sent me this picture and asked if I could make her one. I could tell it is a copper pendant, most likely etched. In theory I can do copper etching, and I have the bookmarked web pages to prove it, but in reality I had never tried it. Most of my customers want this type of look in silver, so I normally use PMC with a custom texture sheet. (Note to self: write a tutorial for that.)
I wanted to try salt water etching because I aim to be The Lazy Etcher, so I’d prefer to just pour the solution in the sink when I’m finished and “chase it down with plenty of water,” as my organic chem professor used to say. I dragged my husband, whom I met in that o-chem lab, to Radio Shack to obtain a single D cell battery holder and a couple of alligator clips. I noted that The Shack also carries ferric chloride in case this method didn’t work. (Ferric chloride just needs baking soda to neutralize it anyway, not that bad.) I also noted the irony that it’s usually the husband dragging the wife to Radio Shack. Thank you for not being an electronics geek, sweetie.
Which of these does not belong?


