Posted on 2 Comments

The most wonderful time…

This morning was cool and crisp, sunny with a few puffy clouds.  Gorgeous!  Perfect fall weather.  It was my kids’ first day at preschool, and I am renting a space nearby for a studio so I don’t have to drive home between drop-off and pick-up.  !!!

My building

As other parents were taking pictures and hiding tears I made a quick exit and couldn’t wipe the smile off my face.  I walked by the coffee shops to say hi to other preschool moms.  (There will be plenty of time for good coffee; I was already wired.)  I walked to Simply Charming Boutique to check on my Sedona collection and show them some new graduated turquoise strands I bought.  (They are my middle-man, so they know the customers and I don’t.  I like getting a read on things when I can.)  I love being downtown!  Finally I unloaded a box of stuff at my studio, only to realize I forgot to pack my pliers which is like forgetting my hands.  I had been a little disappointed at the thought of being cooped up inside on a day like this anyway, so I drove home and enameled beads with my torch.

Blurry, but you can see some of the colors

For the enamel nerds: I’m testing colors from my sample pack from Rio of Milton Bridge transparents, and I really like that Ruby transparent bead toward the center.  And over to the right there’s Autumn Brown.  And several of the others have Autumn Brown layered over something bright (Turquoise, Nile Green from Thompson, etc.)  Some of the deeper green-blues have Mallard Green in them, another MB I like.

We didn’t have much cool weather over the summer (my bench is in the garage) so it was nice to have a chance to experiment with color layering and bead-gripping techniques.  Torch-fired enameling is tricky for me because I don’t want the bead to rotate on the mandrel, but I do want to get it off easily when I’m finished.  And now I can work on that because it’s the most wonderful time of the year.

Posted on 1 Comment

Sedona sampler necklace

When I don’t know what to make, or I don’t have enough of any one component to make a whole necklace, I make what I call a sampler.  It’s not really a sampler per se, more like a charm quilt where every square is made from a different scrap of fabric.  But to me “charm necklace” still conjures up images of plastic charm necklaces from the 80s so I use the term “sampler.”

I digress.  I’m on a turquoise-copper-silver kick right now, so the latest addition to my Sedona line is this necklace.

It started with this pendant, which is a section of copper water pipe with a nugget of turquoise pinned on silver wire.

Pinning, in this case, is using a torch to ball the end of a wire, trapping something on it.  If you use a lame torch like the one on my bench that is really meant for caramelizing the top of crème brûlée, you might burn your stone before balling the wire.  Not that that ever happens to me.  (Note to self: Get the oxy/acetaline Little Torch out of the shed because it would be awesome at pinning.)  I have a habit of losing interest in a necklace once I finish the pendant, and then I just stick it on a chain and call a day.  Either that or my kids wake up from their naps and my creative streak is curtailed.  Anyway, I thought this pinned pipe pendant deserved something more than a chain, something more artful and creative, so I created the sampler necklace.  But then it became so busy and visually heavy that the pendant was better off being showcased on a chain.  And so I made a different pendant, slightly larger and plainer, for the sampler.

This picture was taken in my studio, and I purposefully didn’t crop out my tan line to prove (to my mother who reads this) that I have a dress on.  See that little swatch at the bottom edge?  Also in the background you can see my card catalogues, which make awesome bead-strand storage.  (My local library in Delaware went digital around the same time I was making jewelry there, so I taught beading at summer library camp in exchange for their old card catalogues.)

Posted on

Use what you have

There’s a decorating concept called “use what you have” which is a low-budget way of drawing from your current accessory stash to freshen up the look of a room in your house.  It forces you to be creative instead of shelling out money for more components.  I needed to make a grouping of earrings to take to the shop, something to fill in and coordinate with my summer and fall collections, so I challenged myself to draw from the components I already have instead of ordering parts. 

I chose to draw from various sizes of jump rings left over from when I used to sell chain maille kits.  I didn’t want to make chain maille earrings per se, but I did hook rings together using a mixture of different textures to make it more interesting.  Added some goldfill bubble chain and rings into the mix for a bimetal look, and voila.

There are some shaggy loops and subtle nods to Japanese maille, but not really any chain maille patterns. I also cut discs and washers from my precious patterned silver, which I have been hoarding for years.  (Actually, I think it’s considered hoardering since I can order more.  No, hoardering is not the act of ordering multiple drinks right before happy hour ends, but ordering more of the prized items in my bead stash just so I don’t have to use them up.)

What do you have in your (kitchen, closet, studio) that you can use instead of buying more?

Posted on

More Sedona

The next pieces in the Sedona series…

Etched copper caps


Raku glazed ceramic


The last pair is my favorite so far, inspired by what Kristi Bowman did with her copper components.  The copper components have oak leaves and acorns, and sterling silver rivets attach it to the turquoise wheels.

It took me as long to photograph, post, and describe those earrings as it did to actually make them.  This is why I am so grateful to outsource my selling.  That being said, I’m building up my inventory for a fall grouping at the shop, which means these will be sitting in my studio until then.  If you’re dying to have something, let me know.   Earrings are around $28-36 to give you an idea.

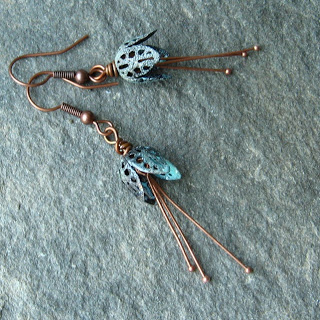
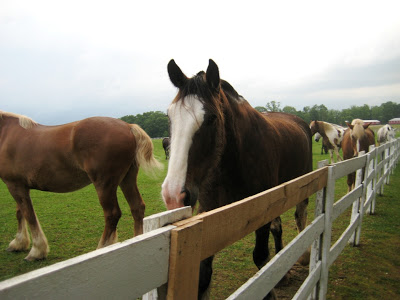
A word about Sedona…  Although featuring copper and turquoise, I don’t intend for this line to look “southwestern.”  The turquoise isn’t the bright, clear stuff from Sleeping Beauty mine that is commonly found in inlaid Native American jewelry.  There will be no silver feathers, squash blossoms, or scalloped bezels.  I wanted it to have more of a “western” feel… My inspiration includes horses, their leather tack and silver stirrups, a little bit rustic and rugged.

Here’s a question for the lurkers: Would you wear copper earwires?  For example the raku glazed ceramic earrings above have only copper so I think it might look odd to put sterling hooks on, but I think some people are unable/afraid to wear anything but gold or sterling (which is silver+copper).

Stay cool out there and THINK FALL!

Posted on 2 Comments

Sedona debut

Just talking about the copper and turquoise had me itching to make some.  So after the kiddos were in bed last night I had a go.  I have several designs swimming around in my head, and I actually have some paper sketches I made in a frenzy after I *dreamed* about this.  (My dreams tend to vaporize the moment my feet hit the floor.)  Dreaming about jewelry is more of a sickness, really. It doesn’t go away at night like so many people’s jobs.

Enough talk, here are some pictures.

Copper, bronze, turquoise nuggets
Torch-enameled flower buds, copper plate


Raku ceramic, boro lampwork, copper
Posted on 1 Comment

Sedona

Hi, gang. I know it’s been a while since I checked in, but it’s summer and I have even less bench time than usual. But it’s summer! And it has been so mild and beautiful. What better time to think about fall?

Here’s what’s on my bench…  (It’s Bead Table Wednesday.)

Copper and turquoise.  No, that’s not turquoise, but it was sitting with my photo props and is making its internet debut.  I actually don’t know what stone it is; I inherited my great aunt’s rock collection and I think it was in there.  She used to polish her own cabs — very cool.  I remember digging through her dops and tumbled rocks and such when I was a little girl, which probably planted seeds for my love of making jewelry.

Anyway, what is the copper part of that picture?  I don’t take time to do a lot of sketch-planning in my jewelry making, but I did sketch out some things to cut out and hammer and play with for my fall line, which I’m calling Sedona.  I’m planning to use hammered copper, plenty of turquoise (and other teal things), some verdigris patina on copper, and oxidized silver.  Like this…


Leather, copper, sponge coral, turquoise, c. 2007

Alas, my studio is across the hall from my sleeping kids so I haven’t done much hammering lately.  It forces me to plan more, which is a good thing.

Posted on 2 Comments

Sea glass clusters

I’ve got summer and beaches on the brain.  Steve and I love to comb the sand (on certain beaches) looking for sea glass. I have containers full of pieces waiting to be made into jewelry, so in anticipation of beach season I made up a grouping of these charm cluster pendants.
I love the puns that people use in naming a beach house

Each necklace has a piece of sea glass or chalcedony, a sealife charm, and stamped phrase like “beach babe” or “by the sea.”

I used my newest set of letter stamps which are tiny lowercase letters.  They’re especially hard to stamp perfectly straight, so I am embracing the whimsical look that results.  These are headed to the shop downtown, but feel free to email me if you’d like something similar.  I can customize the phrase I stamp if you prefer your kids’ names or (ahem) the name of *your* beach house.

Posted on 1 Comment

Personalized Pieces

I have made hundreds of necklaces for moms and grandmothers representing their families.  Stamped discs and other shapes, one tag per name or all the names on one like this grandmother’s tag. (This is her son’s family and her daughter’s family was on a second tag.)

I really like the look of initials with a dot border…

… so I decided to make one for myself now that we have Bowen.  Except if I do my children’s initials it’s either a type of tampon (OB) or body odor (BO – also that looks like just Bowen’s name).  So I thought I’d add Steve’s initials to make an odd number, but if I put them in order of appearance in my life it makes SOB.  Add in my own initials and people are going to think I’m really into Japanese noodles.

So back to square one with just my kids’ names…  I could collectively refer to them as Bolivia.  Or oboe.  And so it goes… The cobbler’s kids remain barefoot and I don’t have a stamped name necklace to wear.

Mother’s Day is coming up, so please don’t wait until May to request a personalized necklace for a mom in your life.

Posted on 2 Comments

Color inspiration

Do you ever get in a rut with color?  For me I get stuck on robin-egg blue for spring, and burnt orange in fall.  The color wheel is just not that inspiring for me, so if you told me to use a triadic color scheme I wouldn’t get much beyond this.

Bright orange, purple, and green.

Sometimes I just have to see just the colors in question together to get excited about it, and sometimes it takes a version of the color to inspire me, like coral instead of bright orange.  Today (ahem, during the sermon at church) I couldn’t stop staring at my paisley belt.  I never would have put plum, olive, sage, salmon, and orchid together but it totally worked.  And look!  It’s almost the same triadic combination, but a springy fresh version of it.

And then I was thinking about how the jewelry version of the belt would be something from Laura Gibson.

Brandi Hussey is a whiz with color and has written a tutorial on how to use a picture to create a color palette in Photoshop.  So I tried it.

When you’re looking for new color combinations, take your camera to a store that sells fabric or fine stationery.

Notecard from PaperSource

Or find a fine art image, like the monthly challenge over on Art Bead Scene.

And then make a palette from it, even if you just do it in your head.  And then make jewelry that incorporates colors from that palette.  Mix some colors and don’t worry about the rules!

Update:  Molly has a great suggestion down in the comments (Thanks!):
May I also suggest using this amazing tool from Sherman Williams for creating a color pallet from any image. It’s called Chip It! And you can add it to your tool bar just like the Pinterest “Pin It” button. You can check it out here: http://letschipit.com  It is a designers dream!!

Posted on 1 Comment

BTW

Our plumber, Glen, came to swap out the faucet in the hall bath so our 3-year-old can wash her hands by herself.  I had called him after deciding that cutting copper supply lines was outside of our DIY realm, and after Glen was finished he was collecting all the pieces and I asked if he had plans for the old copper pipes and that brass ring thingy.  When he said they were just going in his scrap bin to recycle, I was all like, “What else is in there?”  One person’s trash is another’s treasure. 

Look at that natural verdigris
I am planning to cut the pipe into segments to be sliders on Viking knitting or braided wire.  (My tutorials for Viking Weave and Vertebraid can be found here.)

What’s on your bead table this week?

Update 4/22: Glen brought me a whole bag full of those brass rings.  Yay!